Requirements
An exploitable game (Original games work, some Platinum Hits with specific serials work)
- Splinter Cell (All versions of this game works, including PH)
- MechAssault (If PH, get serial MS02301L)
- 007: Agent Under Fire (If PH, get serial 1448517)
- Tony Hawk Pro Skater 4 *New Exploit* (All versions of this game works, including PH)
- PASSWORD FOR GAMES: 8k7&V^0z$eQe!jbD
- Rocky5’s Softmodding Tool
- MS dashboard 5960 – more info if you aren’t on it
- WinRAR – install this before we get started
- ImgBurn
- DVD Burner
- Blank DVD-R or DVD+R (I’ll try to find the compatibility list as I think there is one, some Xbox’s like the + some like the -.
Pick a method to deliver the files to your Xbox
- Action Replay – This has become tough to come by in recent years. If you don’t have this, there are other methods (and they are cheaper than buying a $60 used action replay!)
- I’ll be covering the Flash drive method as I’m going to assume most people will end up using this in 2019-2020+. If you are going to use the AR, you will want to follow the steps in the SID 5.11 tutorial for transferring over the files to your memory card (but you’ll be using Rocky5’s files).
- Flash drive – For this method, you will need some hardware and software tools
- [Hardware Option 1] Female USB to original Xbox adapter [Ali Express ~$2 | Amazon ~$10] – This is probably the cheapest and “quickest” way (Ali will probably take a month or longer, Amazon a couple days).
- [Hardware Option 2] Modify a component that hooks into your Xbox.
- Buy a compatible flash drive – Some people have kept this a secret but one Youtuber said this one works: SanDisk Cruzer Blade 4GB ~$10
- This method will cost between $12-20 and you will have more space than the 8mb memory card that comes with the AR.
- Xplorer360 v0.9 b6 – You will need this program to transfer the files over to your flash drive.
Preparing to softmod
- Turn on your Xbox
- Plug your flash drive into your USB to Xbox adapter.
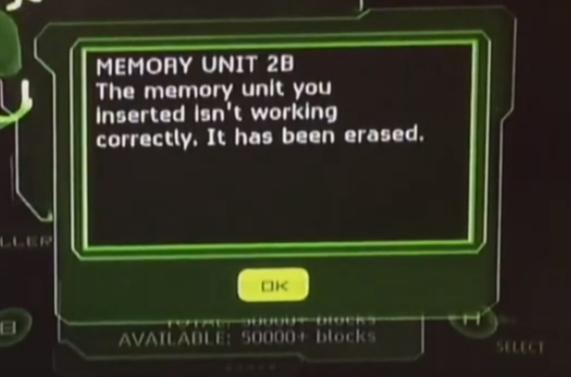
- Go to Memory. If all went well and the flash drive is compatible, it will be formatted to be used in the Xbox and you should see:
- Remove the flash drive and plug it into your computer. You’ll be asked to format it, click cancel.
- Unzip the Rocky5’s Softmodding Tool you downloaded.
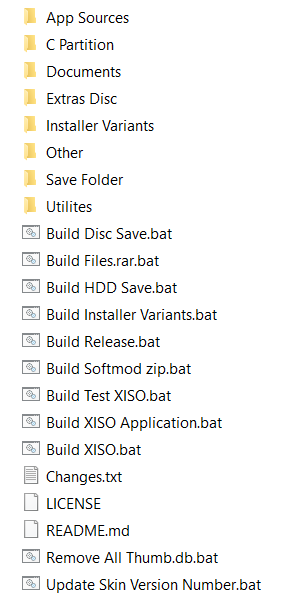
- In the unzipped folder, you will see a list of files and folders:
- Double click Build Softmod zip.bat. Command Prompt and WinRAR will pop up for a short period while it creates the zip: Xbox Softmodding Tool.zip. While you are here, double click Build XISO.bat to build your softmod DVD that will contain more applications to install.
- Right click the zip file and selected Extract To Xbox Softmodding Tool\
- Go to Xbox Softmodding Tool > Softmod Package. You should see all the softmod files. Double click [your game].zip, WinRAR will popup and you will see a UDATA folder. Double click that. You will see a folder (i.e. 5553000c), drag this to your desktop. Do the same with the Softmod Save.zip.
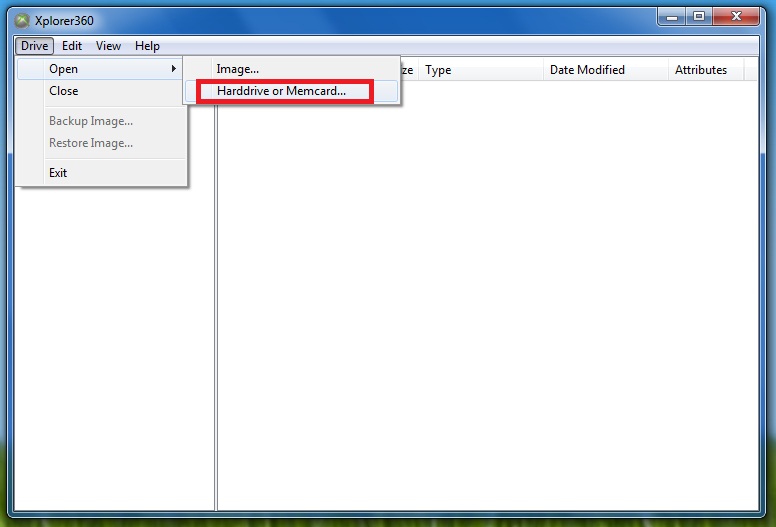
- Open Xplorer360. Go to Open > Harddrive or Memcard…
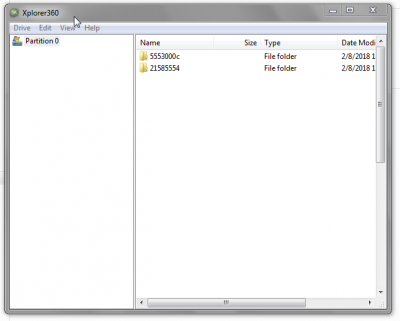
You will see Partition 0 in the left window, make sure you click it once to select it. Now drag and drop your 2 softmod file folders into the window on the right.
- You can now close Xplorer360, remove the flash drive, and plug it into your Xbox USB adapter.
Xbox Softmodding Tool Extras Disc
We’ll start this now so while you execute the softmod exploit in the next section, you can be burning to a disc and waste no time.
- Launch ImgBurn and select Write image file to disc
- Insert your blank DVD-R or DVD+R into your DVD burner
- Click the browse button and navigate to your Xbox-Softmodding-Tool-master folder to locate the ISO file you created through the .bat file in step 7 above. Select it and click Open.
- Click this button to begin burning the disc
- Move on to the next step and ImgBurn will let you know when the disc is done.
Let’s softmod your Xbox
- Start up your Xbox and make sure your flash drive is connected. Make sure you are using composite cables, not component.
- Transfer the files onto your hard drive (hdd). To do this, go to the “Memory” screen from the main standard MS Dashboard. When you get into the memory menu, click on the memory card (by pressing left on the D-Pad) and select it by pressing A. When you get into your memory card and find the files, you might have to press the right button on your D-Pad to select the file and then choose copy. Do this for BOTH files or else the installation will not work/start.
- Put your game in and load up the Linux “checkpoint”.
- Once it is loaded up, it will ask you to press A to proceed with the softmod installation. Press A.
- You will have a couple prompts that you can read, otherwise just click “I understand”. It will continue installing necessary files, apps, and dashboard. Do NOT turn off your Xbox. Just let it go through the process.
*** Once it launches to the new dashboard, you can switch back to component video cables. *** - You’ve just softmodded your Xbox!
Xbox Softmodding Tools Extras Disc
- Your disc should now be done burning. Remove it from your PC and place it in your Xbox.
- Launch DVD
- Right now, your dashboard doesn’t have any audio. To fix this, you’ll need to go to Install Dashboards > MS Dashboards > Stock MS Dash 5960 > Install, select Yes and then Ok
- When it asks about installing the audio files, select Yes
- Restart your Xbox. When you scroll through the dashboard options, you should now have sound!
- You can now Launch DVD again and go through the Install options to install emulators, game mods, applications, and other dashboards.
- Now, go through the rest of our Xbox Tutorials and Xbox Applications sections. You most likely will want access to Xbins to see all the goodies the Xbox Scene has to offer.
- You also have the ability to FTP to your Xbox. Be sure to follow our FTP Tutorial: How to FTP to your Xbox
- Other cools things you can do is adjust the fan speed for performance or quietness. It’s suggested to change it to 2.5. This softmod also comes with multiple skins so be sure to scroll through and pick the one that you enjoy the most.
- I’m not sure if XBMC is on the disc, if it isn’t, I highly recommend picking it up and installing it!
Installing a larger harddrive
Rocky5 has updated Chimp to automatically format with the correct cluster sizes making the process of upgrading to a bigger harddrive extremely easy!
Requirements
- Original Xbox compatible harddrive
- For SATA HDD’s, SATA to IDE adapter
- You’ll need an 80-pin IDE cable if you are using the adapter. You won’t need it if you are using an old IDE hdd.
- Molex Power Splitter
- Chimp 261812 – can also be installed via the Extras disc
Steps
- Make sure your new hdd’s jumper notch is set to slave before you proceed!
- Open your Xbox
- Use the Molex power splitter and attach it to the one that is currently powering your Xbox hdd
- Make sure you are using the composite cables to connect your Xbox video to your TV, otherwise Chimp will not boot.
- Boot up your Xbox
- Put Chimp in your E:/apps
- Before running Chimp, you will remove the IDE cable from your DVD drive and place it on the hdd you are installing (while the Xbox is running, it won’t boot if the DVD drive is not connected).
- Once that is connected, launch Chimp.
- Press A on first menu (it should be selecting an image that looks like a chip that says Fatx)
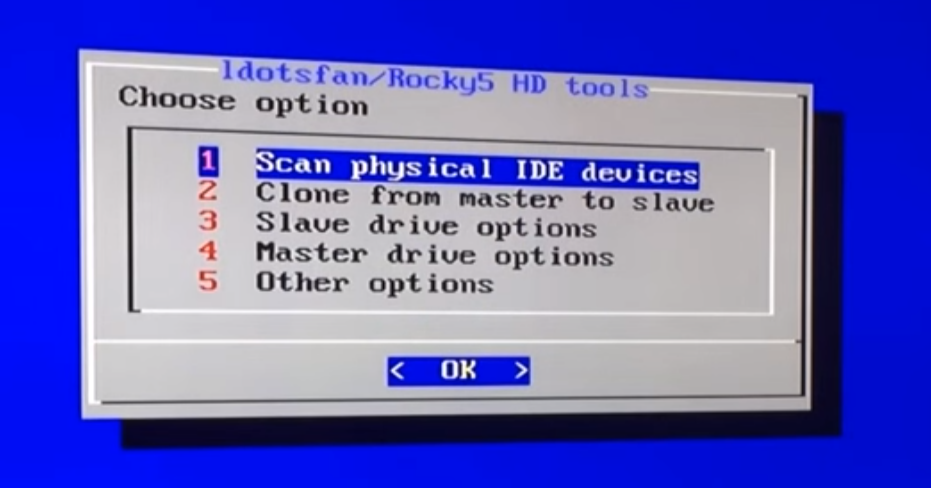
- Let it run through its processes until you reach a menu that looks like this:
- Press A on option 1 to check the status of your hdd’s, making sure to check the model of the new hdd and that it says it is set to slave and unlocked.
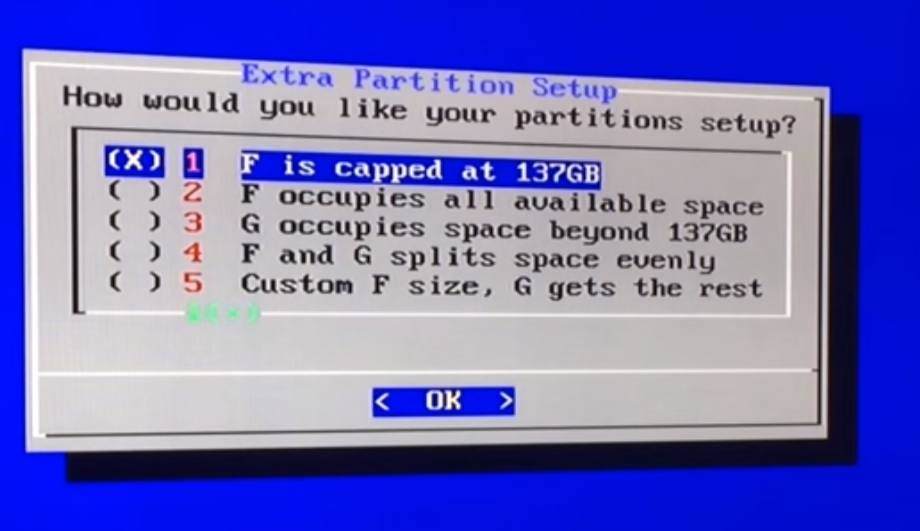
- Then select option 2 > Selective (Select Partitions). If upgrading from a stock Xbox hdd, you’ll select Option 1 for C & E. If you are replacing a drive, pick the option accordingly.
- You’ll then get this menu, you will have to determine which option is best for you and the size of harddrive you are installing:
- Once you select the option above, it will ask if you would like to format, click Yes. This will automatically detect your harddrive size and format the cluster size accordingly!
- Once it is done cloning, you’ll be asked if you would like to lock the slave hdd. Select Yes. You should get a confirmation if it was successful. If you would like to double check, you can select option 1 on the main menu to see that it is locked.
- Note: If it doesn’t lock, you most likely don’t have a compatible harddrive, which then (I believe) you would need to TSOP or have a modchip.
- You can now power down by either using the power button or going to Other Options > Shutdown.
- Now you can remove the old harddrive and place the new harddrive into the Xbox, put the screws back in, close up the Xbox, and boot up your newly expanded softmodded Xbox!
Extras Disc
The advanced apps that are on the Rocky5 Extras disc:
- Chimp 261812
- XBP Table Writer
- XBPartitioner
- ConfigMagic v1.6.1

